Sending still images and movies from a camera to a smartphone (Wi-Fi function) (PowerShot S110)
07-May-2015
8201649800
Solution
Add a smartphone with Wi-Fi functionality to the list of available devices as follows.
Add a smartphone to your list of devices to connect to via Wi-Fi.
When establishing a Wi-Fi connection with a smartphone, you can either use the camera as an access point (Camera Access Point mode) or use another access point.
NOTE
- Follow these instructions when using the camera as an access point.
When using another access point, see Connecting to a wireless LAN (Manual Setup).
- Before connecting to a camera via Wi-Fi, download and install the dedicated [ Camera Connect ] (free) application on your smartphone.
- You can also configure this setting through touch-screen operations.
If a Wi-Fi connection to the camera cannot be made using Camera Connect, please refer to The camera cannot be connected via Wi-Fi using Camera Connect.
Connect to the smartphone over the Wi-Fi.
1. Press the <Playback> ( ) button on the camera.
) button on the camera.2. Press the < Wi-Fi> ( ) button.
) button.
3. Operate the <directional buttons> or turn the < > dial to choose
  , and then press the <FUNC./SET> (
 ) button.
> dial to choose , and then press the <FUNC./SET> () button.
4.Operate the <directional buttons> or turn the <> dial to choose [Add a Device], and then press the <FUNC./SET> () button.
> dial to choose [Add a Device], and then press the <FUNC./SET> () button.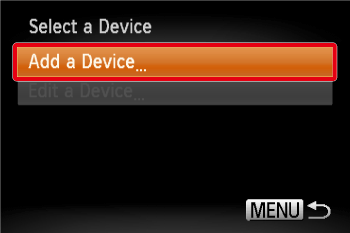
NOTE
- If you register a smartphone, that smartphone's name will appear on the screen in step 4. From the second time onward, select the smartphone's name to make the connection.
5.Operate the <directional buttons> or turn the <> dial to choose [Set Camera As Access Point], and then press the <FUNC./SET> () button.
> dial to choose [Set Camera As Access Point], and then press the <FUNC./SET> () button.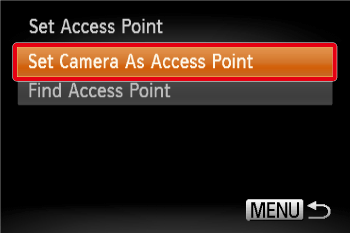
6. The following screen appears.
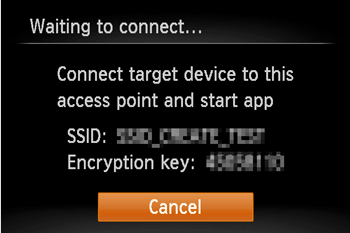
Operating the smartphone, connect to the access point shown on the camera's screen.
Choose the displayed SSID (network name) from the smartphone’s Wi-Fi setting menu. Enter the encryption key(WEP key) displayed on the camera screen into the password field on the smartphone.
7. Start [ Camera Connect ] on the smartphone.
NOTE
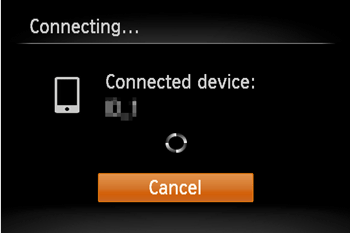
- Once the smartphone is recognized on the camera, the device connection screen will be displayed on the camera.
8. Choose a smartphone to connect to.

9. The following screen appears.
Choose [No].
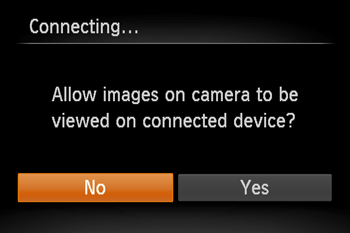
- Choose [Yes] to use a smartphone to send images from the camera to the smartphone, or to geotag images on the camera.
10. The following screen appears.
11. Once you have connected to the smartphone, a screen like the one below will appear.
NOTE
- The image quality level for movies that can be sent may differ depending on the smartphone. Refer to the instruction manual provided with your smartphone for details.
- To add multiple smartphones, repeat the above procedures starting from step 4.
- To change privacy settings for smartphones added to the list, choose the smartphone whose settings you want to change from [Edit a Device] in step 4, and then choose [View Settings].
- When a connection destination is set using the Touch Actions setting, you can send images from the next time by just performing touch operations without needing to perform the connection operation again.
- See the Camera User Guide for details on Touch Action settings.
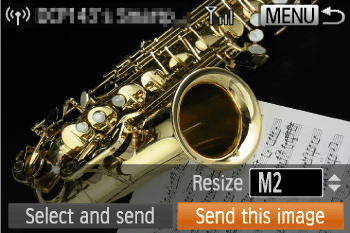
12. Turn the <> dial to choose an image to send.
> dial to choose an image to send.Press the < ><
>< > buttons to choose [Send this image], and then press the <FUNC./SET> () button.
><> buttons to choose [Send this image], and then press the <FUNC./SET> () button.
NOTE
- When uploading to YouTube, read the terms of service, choose [I Agree], and press the <FUNC./SET> () button.
- Image transfer will begin.
- After images are uploaded to a Web service, [OK] is displayed. Press the <FUNC./SET> () button to return to the playback screen.
- After sending images to a camera or smartphone, [Image sent] will be displayed, and the display will return to the image transfer screen.
- To disconnect from the camera, press the <
 > button, and after the confirmation message, choose [OK] (either press the <><> buttons or turn the <> dial) and press the <FUNC./SET> () button.
 - On the screen, wireless signal strength is indicated by the following icons.
[  ] high, [
  ] medium, [
  ] low, [
  ] weak
] high, [ ] medium, [ ] low, [ ] weak However, no icon is displayed when the camera is used as an access point.
13. The following screen appears.
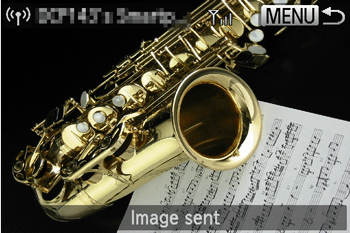
After the image has been sent to the smartphone and the [Image sent] message appears, return to step 12.
14. Press the <><> buttons to choose [Select and send], and then press the <FUNC./SET> () button.
><> buttons to choose [Select and send], and then press the <FUNC./SET> () button.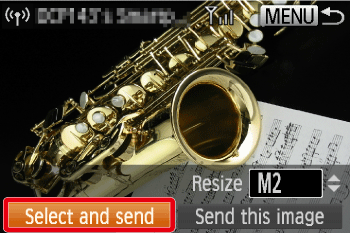
15. The following screen appears.
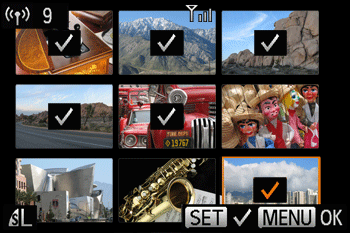
- Press the <FUNC./SET> () button. [
 ] is displayed.
 - To cancel selection, press the <FUNC./SET> () button again. [ ] is no longer displayed.
- Repeat this process to choose additional images.
After you finish choosing images, press the < > button.
> button.16. Choose [Send], and then press the <FUNC./SET> () button.
) button.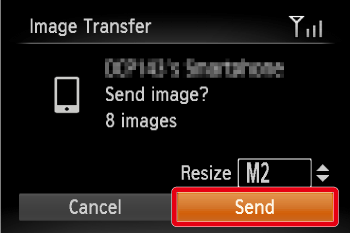
NOTE
You can also choose images in step 15 by pressing the zoom lever twice toward < > to access single-image display and then pressing the <><> buttons or turning the <> dial.
> to access single-image display and then pressing the <><> buttons or turning the <> dial.In step 16, you can choose the resolution (size) to resize images to before sending.
The information registered to the smartphone for CameraWindow cannot be used for Camera Connect. Therefore, it will be necessary to re-register connection information for Camera Connect.
The procedures for making connections with Camera Connect are explained below.
 1. Press the <Playback> () button on the camera. 2. Press the < Wi-Fi> () button. 3. Operate the <directional buttons> or turn the <> dial to choose , and then press the <FUNC./SET> () button. 4. Choose [Edit a Device], and then press the <FUNC./SET> () button.
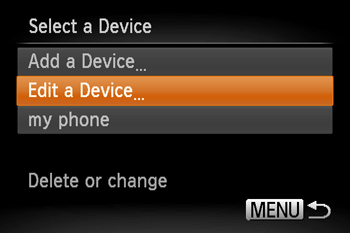 5. Choose the name of the smartphone you installed the CameraWindow app on, and then press the <FUNC./SET> () button.
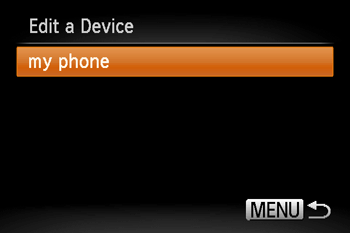 6. Choose [Erase All Connection Info], and then press the <FUNC./SET> () button.
 7. Choose [OK], and then press the <FUNC./SET> () button.
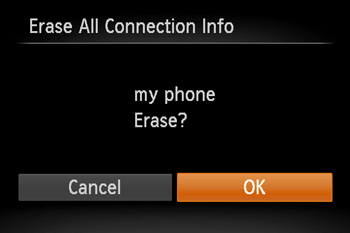 8. When the [Select a Device] screen is displayed, perform the procedures explained from step 4 in Connecting the camera to a smartphone to complete the settings.
NOTE
When you have registered multiple smartphones to the camera, the display reverts to the screen in step 5 if connection settings are erased. In this case, press the <> button to display the [Select a Device] screen, choose [Add a Device], and then press the <FUNC./SET> () button.
> button to display the [Select a Device] screen, choose [Add a Device], and then press the <FUNC./SET> () button.